Creating a wooden mallet is a simple yet rewarding project‚ perfect for woodworkers of all skill levels. Using hardwoods like maple or oak‚ you can craft a durable tool essential for joinery and furniture making. With basic tools and clear PDF guides‚ you can complete this project in a weekend‚ making it an excellent introduction to woodworking.
Overview of the Importance of Wooden Mallets in Woodworking
Wooden mallets are essential tools in woodworking‚ particularly for joinery and furniture making. Unlike metal hammers‚ they provide a softer strike‚ reducing the risk of damaging wood surfaces. This makes them ideal for tasks like tapping pieces into place or fitting joints without causing harm. A well-crafted wooden mallet is both durable and versatile‚ serving as a fundamental tool in any woodworking workshop. Its balanced design ensures precision and control‚ making it indispensable for professionals and hobbyists alike. Investing time in creating or sourcing a high-quality wooden mallet is a wise decision for any woodworker.
Benefits of Creating Your Own Wooden Mallet
Creating your own wooden mallet offers numerous advantages‚ particularly for woodworking enthusiasts. It allows for customization‚ ensuring the tool meets specific needs and preferences. Using durable hardwoods like maple or oak provides a long-lasting instrument. The process is cost-effective‚ as it eliminates the need to purchase a pre-made mallet. Additionally‚ crafting a mallet enhances woodworking skills and satisfaction‚ as you can take pride in using a tool you made yourself. It’s a practical project that combines functionality with personal achievement.
Materials and Tools Required
To craft a wooden mallet‚ you’ll need seasoned hardwood like maple or oak‚ along with basic woodworking tools such as a saw‚ drill‚ and sanding equipment.
Choosing the Right Wood for Your Mallet
Selecting the proper wood is crucial for durability and performance. Hardwoods like maple or oak are ideal due to their density and strength. Look for straight-grained wood to minimize warping and ensure consistent impact resistance. Avoid softwoods‚ as they may dent easily. Seasoned wood is essential to prevent splitting during construction. Properly dried hardwood ensures stability and longevity. While maple is a popular choice‚ alternatives like beech or ash can also work well. Always prioritize wood with minimal knots for a professional finish.
Essential Tools for Crafting a Wooden Mallet
Crafting a wooden mallet requires basic woodworking tools for precise shaping and assembly. A bandsaw or handsaw is necessary for cutting the wood billet. Sandpaper is essential for smoothing surfaces to prevent splintering. A drill press or hand drill will help create holes for the handle. Chisels and mallets assist in shaping and fitting parts together. Safety gear‚ like gloves and goggles‚ is crucial for protecting yourself during the process. A workbench provides stability for accurate cuts and fittings. These tools ensure a professional finish and proper functionality for your mallet.

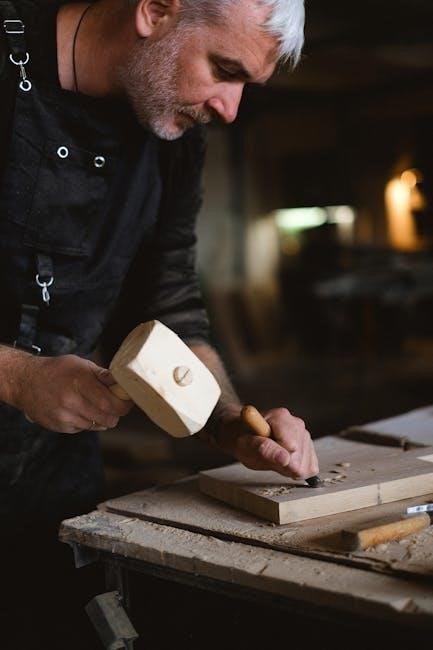
Step-by-Step Guide to Making a Wooden Mallet
Crafting a wooden mallet involves cutting‚ shaping‚ and assembling wood pieces. Start by preparing the billet‚ then shape the head and handle. Sand‚ finish‚ and assemble for a durable tool.
Preparing the Wood and Cutting the Billet
Begin by selecting seasoned wood to prevent splitting. For the mallet head‚ hard maple is ideal due to its density and shock resistance. Cut the billet to the desired dimensions using a bandsaw or hand saw‚ ensuring precise measurements. Split the wood from a log or obtain it from a wood pile‚ then rough-shape it with a drawknife or chisel. Sand the Billet Blank to achieve a smooth surface and proper fit for the handle. This step ensures a sturdy foundation for your mallet.
Shaping the Mallet Head and Handle
Use a drawknife or chisel to shape the mallet head‚ ensuring a rounded edge for even force distribution. Sand the head to a smooth finish. For the handle‚ select straight-grained wood like oak and cut it to size. Use a spokeshave or sandpaper to shape the handle‚ creating a comfortable grip. Ensure the handle tapers slightly toward the head for a secure fit. After shaping‚ sand both parts thoroughly to remove splinters and create a seamless joint. This step ensures the mallet is functional and comfortable to use.

Handling and Finishing
Use a moisture meter to ensure wood dryness before finishing. Apply a durable finish and secure the head and handle for optimal performance.
Applying a Durable Finish to Protect the Wood
Protecting your wooden mallet with a durable finish is crucial for longevity. Use a water-resistant sealant or oil-based finish to shield the wood from moisture and wear. Ensure the wood is dry‚ as moisture can lead to warping. Apply thin‚ even coats‚ allowing each layer to dry before reapplying. This process prevents the wood from splitting and ensures the mallet remains functional for years.
Ensuring a Secure Fit Between Head and Handle
A secure fit between the mallet head and handle is vital for functionality. Use a wedge or strong adhesive to ensure the handle is tightly seated in the head. Properly aligning the handle and head during assembly prevents loosening over time. For added strength‚ apply epoxy or wood glue to the joint. Allow the adhesive to cure fully before testing the mallet. A sturdy connection ensures reliable performance and durability‚ making the tool safe and effective for various woodworking tasks.

Safety Considerations
Always wear safety goggles and a dust mask when working with power tools. Keep loose clothing tied back and avoid distractions while cutting or shaping wood.
Identifying Potential Hazards in the Workshop

Identify potential hazards like sharp tools‚ flying debris‚ and electrical equipment. Ensure proper ventilation to avoid inhaling dust and fumes. Keep work areas clean and well-lit to prevent tripping. Store tools securely and maintain equipment to avoid malfunctions. Always wear protective gear‚ including safety glasses and gloves‚ when operating power tools. Regularly inspect tools and materials for damage. Stay focused and avoid distractions while working. Conduct a risk assessment before starting projects to minimize accidents and ensure a safe woodworking environment.
Best Practices for Safe Woodworking
Adhere to safety guidelines by wearing protective gear like goggles and gloves. Avoid loose clothing and jewelry that might catch machinery. Keep long hair tied back. Use push sticks or splitters when working with power tools to maintain control. Never reach over moving blades or bits. Ensure proper tool maintenance and sharpness to prevent kickbacks. Follow manufacturer instructions for all equipment. Keep emergency supplies‚ like a first aid kit‚ nearby. Stay alert and avoid woodworking when fatigued. Regularly inspect tools and materials for damage to ensure a safe working environment and successful project outcomes.

Free PDF Resources for Wooden Mallet Plans
Downloadable PDFs offer detailed step-by-step guides‚ materials lists‚ and templates for crafting wooden mallets. These resources are ideal for woodworkers of all skill levels‚ ensuring a successful project.
Where to Find Reliable and Detailed Plans Online
Reliable wooden mallet plans are widely available online‚ with many websites offering free and premium PDF downloads. Popular woodworking forums and DIY communities provide detailed guides‚ often including step-by-step instructions‚ scaled templates‚ and materials lists. Some plans feature multi-language support‚ such as English and Spanish‚ catering to a broader audience. Additionally‚ full-scale templates and exploded views ensure precise crafting. Many resources are designed for quick weekend projects‚ making them accessible to woodworkers of all skill levels. Online marketplaces and woodworking blogs are excellent sources for high-quality‚ downloadable plans.
Features of High-Quality PDF Plans
High-quality PDF plans for wooden mallets include detailed step-by-step instructions‚ scaled diagrams‚ and full-scale templates. They often feature exploded views and cutting lists for precise measurements. Many plans cater to both Imperial and Metric systems‚ ensuring universal accessibility. High-resolution images and clear illustrations help users understand complex steps. Additionally‚ these plans may include material recommendations‚ such as suggested hardwoods‚ and finishing tips. Multi-language support is also common‚ making the plans accessible to a global audience. Professional layouts and easy-to-follow formats ensure a seamless crafting experience.
Crafting a wooden mallet is a simple yet rewarding project. With basic tools and clear plans‚ you can create a durable tool that enhances your woodworking experience. Start today and enjoy the satisfaction of making something truly useful for your workshop!
Final Tips for Successful Mallet Making
For a successful mallet-making project‚ ensure your wood is well-seasoned to prevent splitting. Use proper grain orientation for strength and durability. Sand all surfaces thoroughly before finishing to achieve a smooth texture; Apply a durable finish like oil or wax to protect the wood. When assembling the head and handle‚ use a strong adhesive and clamp firmly. Allow ample drying time for the glue to set. Avoid using the mallet near open flames or sparks. Finally‚ store your mallet in a dry place to maintain its condition. Start your project confidently!
Encouragement to Start Your Project
Embark on your wooden mallet-making journey with confidence! This project is perfect for woodworkers of all skill levels‚ offering a rewarding experience and a durable tool for your workshop. With clear PDF plans and basic tools‚ you can craft a high-quality mallet in just a weekend. It’s a great introduction to woodworking‚ allowing you to create something functional and lasting; Don’t hesitate—gather your materials‚ follow the guides‚ and enjoy the satisfaction of making your own essential woodworking tool. Your new mallet will become a trusted companion in your creative projects!
Be First to Comment